MVVMHelpers for Windows 8 Metro
I’ve been doing some Windows 8 Metro programming lately and to help with building more testable applications have ported the MVVMHelpers library over to Metro/.NET 4.5. This post is intended to introduce the functionality and show it off a little.
First, we’ll create a new Metro-based Blank application using Visual Studio:
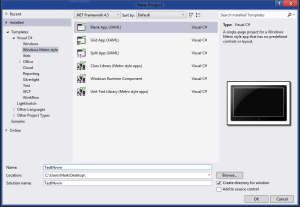
Next, let’s add references to the MVVM library - we’ll use NuGet, but you can also downloads the source from GitHub. Make sure you include pre-release assemblies as this is currently marked as 1.0.0-rc. The package you want is MVVMHelpers.Metro:

This will also add a reference to MEF - which is now shipped out via NuGet. I seriously considered removing my dependency against it, but since Nuget will pull it down automatically, I have kept it for now.
Most of the core classes and converters are present - there are a few breaking changes however. First, there are a few renamed properties and types - mostly for clarity and convention with other libraries. I changed DelegatingCommand to be DelegateCommand and the SimpleViewModel.OnPropertyChanged method to now be RaisePropertyChanged. The converters do not derive from MarkupExtension since Metro doesn’t support that, and none of the Blend behaviors are present - however I did port the EventCommander which was already supported as an attached property - so you can wire up events to commands. Once Blend behaviors are introduced, I plan to port all the relevant behaviors over as well. Here’s the definitive list from the Object Browser:

As a test, let’s create a simple UI with a button, rectangle and TextBlock all within the grid.

Next, let’s add a new ViewModel - we’ll name it MainViewModel. Derive it from JulMar.Windows.MVVM.ViewModel and add two properties: Color and Text and a command ShowPrompt. You will also need to make the class public so it’s data bindable.
Here’s my implementation:
public class MainViewModel : ViewModel
{
    private string _color;
    private string _text;

    public string Color
    {
        get { return _color; }
        set { SetPropertyValue(ref _color, value); }
    }

    public string Text
    {
        get { return _text; }
        set { SetPropertyValue(ref _text, value); }
    }

    public IDelegateCommand ShowPrompt { get; private set; }

    public MainViewModel()
    {
        ShowPrompt = new DelegateCommand(OnShowPrompt);
        Color = "Red";
        Text = "Windows 8 Loves MVVM";
    }

    private void OnShowPrompt()
    {
    }
}
We’ll data-bind the properties and command to the UI elements and set the data context to a new instance of the MainViewModel.
<Page ...>
    <Page.DataContext>
        <TestMvvm:MainViewModel />
    </Page.DataContext>

    <Grid Background="{StaticResource ApplicationPageBackgroundThemeBrush}">
        <Grid.RowDefinitions>
            <RowDefinition Height="*"/>
            <RowDefinition Height="Auto"/>
        </Grid.RowDefinitions>

        <Button Content="Show Text" HorizontalAlignment="Center" VerticalAlignment="Top"
                Grid.Row="1" Margin="20" Padding="10,5"
                Command="{Binding ShowPrompt}" />

        <Rectangle Margin="50" Fill="{Binding Color}" Stroke="White" StrokeThickness="1" Width="200" Height="200">
        </Rectangle>

        <TextBlock HorizontalAlignment="Center" VerticalAlignment="Top"
                   FontSize="48" Margin="20"
                   Foreground="White" Text="{Binding Text}" />

    </Grid>
</Page>
Running the app should produce a red rectangle with the text “Windows 8 Loves MVVM”. Now, let’s add some behavior to it - we’ll use the IMessageVisualizer class to display a prompt. It has a slightly different signature than in the WPF world as it must be asynchronous. Under the covers, the implementation is using the Windows 8 MessageDialog class to display the prompt. Here’s the code:
private async void OnShowPrompt()
{
    IMessageVisualizer messageVisualizer = Resolve();
    IUICommand result = await messageVisualizer.ShowAsync("Would you like to change the text?",
        "Windows 8 Loves MVVM", new MessageVisualizerOptions(UICommand.YesNoCancel));

    if (result == UICommand.Yes)
    {
        Text = "Windows 8 REALLY loves MVVM!";
    }
}
A few things to note - first, the IMessageVisualizer is being retrieved through the normal service Resolve method off the ViewModel base class. You can also create a public property and mark it with [Import] to have it injected via MEF (it must be public however so this isn’t quite as nice as the WPF varient).
Next, it returns a Task instead of just a IUICommand like I do in the WPF world. This is due to the asynchronous nature of Windows 8 - so here is a nice usage of the async / await keywords which are new to C#5.
Much like the latest WPF version of MVVMHelpers, you pass in a list of IUICommands - you can write your own implementation, or use the built-in UICommand type. It also has a set of static properties to build the most common button types: OK, Cancel, Yes, No, Allow, Deny. And a set of static properties to group them: OkCancel, YesNo, YesNoCancel, AllowDeny. The latest MVVMHelpers for WPF (4.10) use this same approach - primarily because I had already started this with Metro and felt it was more flexible than the MessageBox variant found in earlier versions.
The return result is a IUICommand which dismissed the dialog, or null if it was closed through some other means (close button in WPF for example). Here, we compare that against the Yes command and if it’s a match, we change the text.
Next, let’s try out the event commander - add two new commands to the view model, one called MouseEnter and other called MouseLeave, go ahead and back them with AsyncDelegateCommand types to do some async work and create two dummy methods. We’ll use these to change the color of the rectangle from code behind.
Note:
This is not a great example - really we should trip an animation to change the color, but this is just a sample to show off this feature so I’ll stick with it._
Here’s the code I used:
public IDelegateCommand ShowPrompt { get; private set; }
public IDelegateCommand MouseEnter { get; private set; }
public IDelegateCommand MouseLeave { get; private set; }

public MainViewModel()
{
    ShowPrompt = new DelegateCommand(OnShowPrompt);
    MouseEnter = new AsyncDelegateCommand(OnMouseEnter, () => !_changingColor, () => _changingColor = false);
    MouseLeave = new AsyncDelegateCommand(OnMouseLeave, () => !_changingColor, () => _changingColor = false);

    Color = "Red";
    Text = "Windows 8 Loves MVVM";
}

private void OnMouseEnter()
{
}

private void OnMouseLeave()
{
}
Next, I added a color array to drive through, and a boolean we’ll use when we are changing the colors:
private bool _changingColor;
private string[] _colors = {"Red", "Orange", "Yellow", "Green", "Blue", "Indigo", "Violet"};
Finally, the logic will just change the rectangle color:
private async void OnMouseEnter()
{
    _changingColor = true;

    foreach (string color in _colors)
    {
        Color = color;
        await Task.Delay(250);
    }
}

private async void OnMouseLeave()
{
    _changingColor = true;

    foreach (string color in _colors.Reverse())
    {
        Color = color;
        await Task.Delay(250);
    }
}
Note that we will pause for 1/4 second as part of the loop - using again the async / await keywords.
Last but not least, wire it up to the Rectangle PointerEntered and PointerExited events using the EventCommander behavior. This is done by adding the attached property to the rectangle.
<Rectangle Margin="50" Fill="{Binding Color}" Stroke="White" StrokeThickness="1" Width="200" Height="200">
    <Behaviors:EventCommander.Mappings>
        <Behaviors:CommandEvent Command="{Binding MouseEnter}" Event="PointerEntered" />
        <Behaviors:CommandEvent Command="{Binding MouseLeave}" Event="PointerExited" />
    </Behaviors:EventCommander.Mappings>
</Rectangle>
Run the app and you should see the rectangle change colors when you move over it, and then backwards when you mouse out of the shape.
More to come - but this at least gives some indication of the basic framework capabilities. Happy coding!
The sample can be found at: TestMvvm.Win8