Outlined Text in WPF
One thing that’s kind of cool in WPF is that you can use brushes to fill almost anything and that there are some really cool brushes in the toolkit. It always blows people away when you show them a piece of text filled with a live video complements of a Visual Brush.
But, unfortunately text doesn’t have a stroke property - only a fill so you can’t add an edge to it. You can layer another piece of text under it, but often it doesn’t quite match up size-wise when you do this. The solution is to convert the text to a Path which has both a fill and stroke and it turns out it’s pretty easy to do.
If you just have one piece of text you are better off using Blend’s “Convert to Path” option – it will do the one-time conversion for you and you can just insert the shape into your UI. If you have more than one element though it can be tedious, and it doesn’t work at all for dynamic pieces of text - that’s where this TextPath class comes in handy. With it you can create text like this:
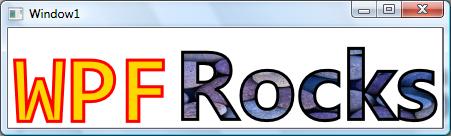
Notice how the text is outlined in a different color – any brush could be used so you could do wacky things like have the “WPF” part be ringed in fire (using the Dreamscene fire video for example).
The class is dead simple to use, it’s a Shape class so you can simply insert it right into your XAML and set the font properties and text:
<StackPanel Orientation="Horizontal" TextElement.FontWeight="Bold" TextElement.FontSize="72pt">
  <me:TextPath FontFamily="Consolas,Courier New" Margin="5" Text="WPF" StrokeThickness="3" Fill="Gold" Stroke="Red"/>
  <me:TextPath FontFamily="Balloon" Margin="5" Text="Rocks" StrokeThickness="3" Stroke="Black">
    <me:TextPath.Fill>
      <ImageBrush ImageSource="rocks.jpg"/>
    </me:TextPath.Fill>
  </me:TextPath>
</StackPanel>
Notice it uses the same font dependency properties as all other text-based framework elements - that allows us to inherit the property values which is useful.
Here’s the sample project which full source code: OutlineTextTest.zip (1.54 MB)